Create a Custom Hire me form with Ninja Forms
I first heard about Ninja Forms on the Apply Filters podcast with Brad Tournard and Pippin Williamson. Apparently they have been around since 2012 but as I was happy with my goto Contact Form 7 and as I didn’t need anything as fancy as Gravity Forms I didn’t think to look into form plugins too often. Then came a project with a very long and complicated form. It was beyond the scope of any of my previous solutions so I decided it would be easier to do it myself. A week and a several hundred test emails later, I vowed to use a plugin next time. I looked at the plugins I had heard about and realised some weren’t as lightweight as Contact Form 7, and more importantly, they weren’t all free. I really don’t have a problem paying for plugins. Some are lifesavers and save me loads of time and effort but I like to keep costs down as much as possible and didn’t want to pay for something unless I really needed it. I amended my vow to convince my clients they didn’t really need a complicated form. If Contact Form 7 couldn’t handle it, it didn’t need doing. I still don’t believe in complicated forms but as it turned out I was the one who needed one. I wanted to streamline the process of requesting a quote on a project for my own site. A lump message in a small textarea wasn’t specific enough for me to judge whether or not I should take on a project. I should mention this could probably be done with Contact Form 7 or most other form plugins but I also wanted an excuse to try Ninja forms. Here is a very basic tutorial outlining how its done: First we draw out the form on paper. This prevents us limiting ourselves by what can be done technically. We don’t want to be influenced by options in the plugin interface when we decide what we want in our form.
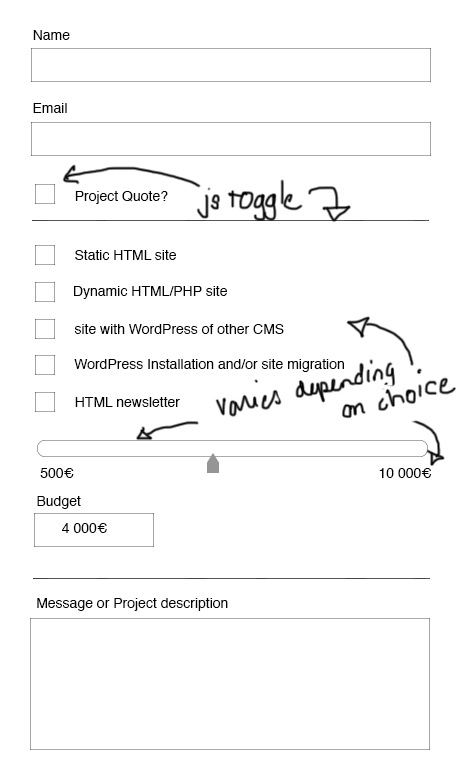 Then we head to the documentation to see how to go about accomplishing this. I figured the best place to start would be Settings and watched a quick and friendly video about basic calculations which wasn’t the right starting point for me but was good to know. Field settings seemed more appropriate and is my preferred style of documentation. No need to go through all of them (or any of them for that matter) they are clearly explained in the documentation. So we’ll choose a Textbox, an Email, a checkbox field, a list, , a calculation field,a textarea, an Antispam field and a submit button. The textbox I labeled “Name” and the Email “Email” because I’m clever like that. The checkbox would serve as a toggle to show further form fields which consist of our “Type of Project” list, and a Budget range slider which wee will be creating shortly. Then we have a “Message” textarea and, of course, a submit button. We’ll also throw in an Antispam field just for fun. To create our custom ninja forms field we will need to paste some code in either functions.php or in a file included there.
We are using 3 functions modified from the ninja forms documentation. The first we create a custom functions that supplies arguments to ninja_forms_register_field()(see reference.) Two of these arguments 'display_function' => 'budget_field_display'and 'edit_function' => 'budget_field_edit'call other custom functions. The first, budget_field_display() is responsable for how the field is displayed on the frontend. This is where we add the html for our range slider. The second, budget_field_edit() handles the field editing on the backend. Here, we are only dealing with the one field, our budget_value. 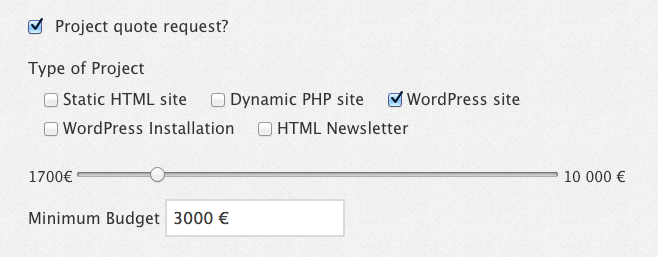 For the toggle functionality we are going to have to group these fields in a
 <div> then toggle it using jQuery (or javascript if you prefer) we’ll give our new <div>an id of “projectQuote”. Because we are dealing with WordPress this will all go in a jQuery no-conflict wrapper and we will load our script properly using wp_enqueue_script(); The Budget range slider is not one of the ninjaform options so we will have to customise it ourselves. HTML5 offers the <input type="range"> which will give us a easy range slider. In the calculation field we will select output HTML (the other option is a textbox). This will provide us with a textbox whose value we will copy into our range input. We will hide the initial textbox as it would only serve to duplicate the information.
We won’t get too fancy with our css (or sass) here but if you want to style the actual range slider it can be done by styling the shadow DOM elements. A good article on styling input type range here.
And there you have it! A basic contact form that doubles as a quote request. I always think its good to give people an indication of what is to be expected price-wise. I would also suggest using something like modernizr to provide a fallback in case javascript is disabled or in browsers where <input type="range">is not supported. Currently Opera mini and previous versions of Android don’t support it. I should also mention that ninja forms allows you to append a form to a specific page or article. For this you should be certain that the same form is not displayed elsewhere on your page as it would have the same ID.